Final project


Arduino code:灯带
// NeoPixel Ring simple sketch (c) 2013 Shae Erisson
// Released under the GPLv3 license to match the rest of the
// Adafruit NeoPixel library
#include <Adafruit_NeoPixel.h>
#ifdef __AVR__
#include <avr/power.h> // Required for 16 MHz Adafruit Trinket
#endif
// Which pin on the Arduino is connected to the NeoPixels?
#define PIN        6 // On Trinket or Gemma, suggest changing this to 1
// How many NeoPixels are attached to the Arduino?
#define NUMPIXELS 60 // Popular NeoPixel ring size
// When setting up the NeoPixel library, we tell it how many pixels,
// and which pin to use to send signals. Note that for older NeoPixel
// strips you might need to change the third parameter -- see the
// strandtest example for more information on possible values.
Adafruit_NeoPixel pixels(NUMPIXELS, PIN, NEO_GRB + NEO_KHZ800);
void setup() {
  // These lines are specifically to support the Adafruit Trinket 5V 16 MHz.
  // Any other board, you can remove this part (but no harm leaving it):
#if defined(__AVR_ATtiny85__) && (F_CPU == 16000000)
  clock_prescale_set(clock_div_1);
#endif
  // END of Trinket-specific code.
  pixels.begin(); // INITIALIZE NeoPixel strip object (REQUIRED)
}
void loop() {
  pixels.clear(); // Set all pixel colors to 'off'
  // The first NeoPixel in a strand is #0, second is 1, all the way up
  // to the count of pixels minus one.
  for(int i=0;i<NUMPIXELS;i++){
    pixels.setPixelColor(i, pixels.Color(255,255,255));
  }
   pixels.show();
  }
舵机
#define SensorINPUT   3  //Connect the sensor to digital Pin 3 which is Interrupts 1.
#include <Servo.h>
unsigned char state = 0;
Servo myservo1;
int pos1 = 0;
Servo myservo2;
int pos2 = 0;
void setup()
{
  pinMode(SensorINPUT, INPUT);
  myservo1.attach(10);  // num1servo控制线连接数字13
  myservo2.attach(11);  // num2servo控制线连接数字13
  attachInterrupt(1, tomplayguitar, FALLING);
  }
void loop()
{
      if(state!=0)
      {
        state = 0;
        myservo1.write(45);
        myservo2.write(75);
        delay(50);
      }
      else
       {
        myservo1.write(0);
        myservo2.write(0);
        delay(50);
       }
}
void tomplayguitar()//Interrupts function
{
  state++;
}
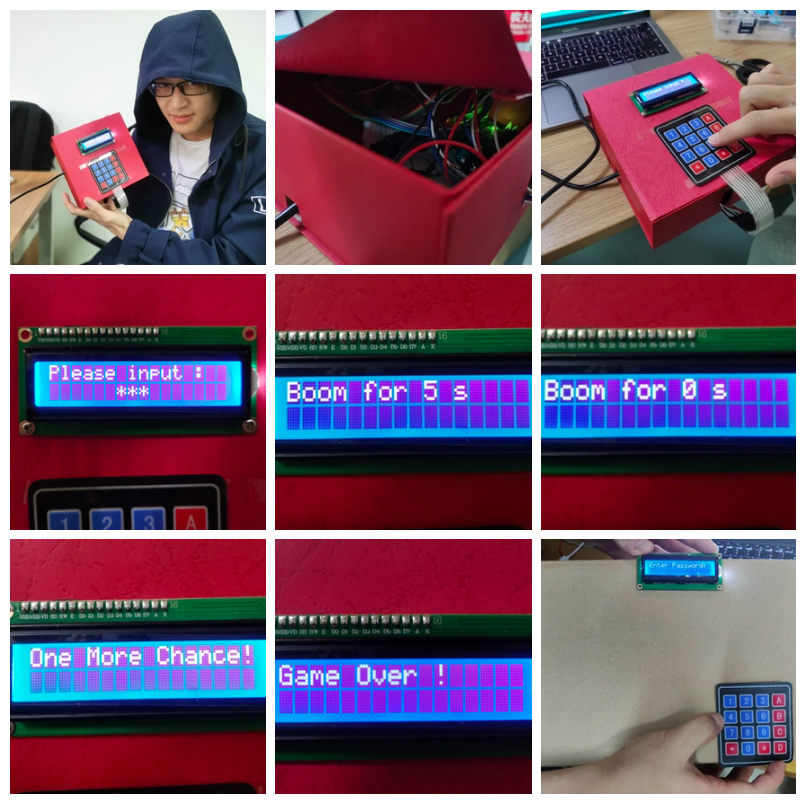
Daily homework
ARDUINO CODE.
#include <LiquidCrystal.h>//1602库
#include <Keypad.h>//键盘库
#include <EEPROM.h>//EEPROM库用来保存修改过的密码,掉电后不遗失

const byte ROWS = 4; //4行
const byte COLS = 4; //4列
//键盘位置
char hexaKeys[ROWS][COLS] = {
  {'1', '2', '3', 'A'},
  {'4', '5', '6', 'B'},
  {'7', '8', '9', 'C'},
  {'*', '0', '#', 'D'}
};
byte rowPins[ROWS] = {A0,A1,A2,A3}; //定义接键盘横排引脚
byte colPins[COLS] = {A4,A5,3,2}; //竖排引脚定义

//新的键盘对象
Keypad customKeypad = Keypad( makeKeymap(hexaKeys), rowPins, colPins, ROWS, COLS);

// 1602引脚,接法参照最上方注释
LiquidCrystal lcd(9,8,7,6,5,4);//lcd连接引脚

String oldPassword = "";//保存老密码
String newPassword = "";//保存输入的修改密码
int addNum = 0;//错误计数
String inPut = "";//保存输入字符串
String n = "";//字符串转整型用的变量
unsigned long now;//现在时间用于计时
unsigned long before;//参考时间用于计时
unsigned long delayTime = 30000;//锁定时间
void setup() {
  Serial.begin(9600);//初始化串口
  // 定义LCD两行16列
  lcd.begin(16, 2);


//开机从EEPROM中读取密码,四位密码保存在EEPROM0-3地址当中
  for (int i = 0; i < 4; i++)
  {
    oldPassword += EEPROM.read(i);
  }
//串口打印测试信息
  Serial.print("Old Password is : ");
  Serial.println(oldPassword);
  delay(2000);
  lcd.setCursor(0, 0);//1602输出位置,格式列、行
  lcd.print("Please input :");//1602输出
}
int i = 6;//'*'号开始位置
void loop() {
  char customKey = customKeypad.getKey();//获取按键
  if (customKey)//有按键按下
  {
    inPut += customKey;//保存输入
    lcd.setCursor(i, 1);//在指定位置输出*号
    lcd.print('*');
//串口打印测试信息
    Serial.println("inPut is : ");
    Serial.println(inPut);
    Serial.println("onece");
    i++;//后移1602输出*号位置
    if (i > 9)//超过输出位置回归
    {
      i = 6;
    }
  }
  //比较密码

  if (inPut == oldPassword) //密码正确
  {
    addNum = 0;//错误次数清零
    Serial.println("Bingo!");//串口打印测试信息
    lcd.clear();//清屏
    lcd.setCursor(4, 0);//输出位置
    lcd.print("Bingo!");//输出bingo
    delay(2000);//延时2秒
    lcd.clear();//清屏
    delay(500);
    lcd.setCursor(0, 0); //1列1行
    lcd.print("Change Password?");//lcd输出是否修改密码
    Serial.println("change password?");//串口打印测试信息
    lcd.setCursor(0, 1);
    lcd.print("1.YES       2.NO");//lcd输出1yes2no
    int a = 1;
    while (a)//等待按键按下
    {
      customK